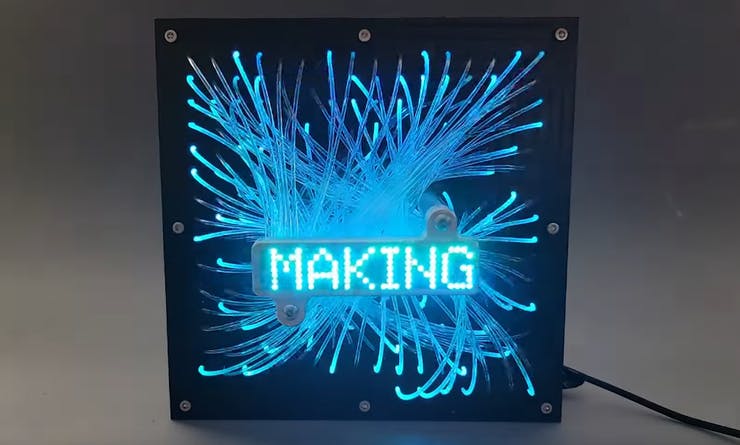
Constructing an RGB LED Matrix From Fiber Optic Filaments
from hackster.io
LED matrices made from many rows of WS2812B LEDs are nothing new, and at this point, quite difficult to innovate with — until elliotmade created his own version, which still has an inner matrix, but takes its light and transfers it away with a series of fiber optic fibers for a dazzling effect. This method of display also enables the dots to be packed much closer together while still retaining most of their original brightness.
The source of light is provided by a single 16x16 WS2812B matrix, which contains a grid of LEDs spaced about 1cm apart. This large number of LEDs also requires a fast processor that is able to output serial color data at a fast rate while also being easy to program for adding new effects, which is why Elliot chose the Raspberry Pi Pico and its RP2040 chip.
As a bonus, the Pico can be programmed in either C/C++ or micropython simply by dragging-and-dropping new firmware via USB. Power is provided to the circuit via a 5V power supply and even added a real-time clock for future time-based displays. Finally, he cut 245 individual lengths of "end-glow" optical fibers, which limit how much light can leak out the sides versus being carried all the way through for maximum brightness.
The back of the project is held together by a 1/8" thick backplate made from steel for extra rigidity, whereas the middle plate was created from laser cut acrylic. The outer front plate was made from a thick piece of polyethylene and has a grid of 256 1.5mm holes that each allows for a single fiber to fit snugly and prevent light from leaking out. With the LED grid now securely fitted, Elliot designed and CNC milled the front 35x7 matrix from a solid piece of aluminum which has mounting points for standoffs. The close proximity of the fiber optic strands means that the resulting picture can be seen sharply.
As the final step, Elliot wires together his Raspberry Pi Pico with the LED matrix, real-time clock module, and a couple of controls for adjusting the current mode. The code running this display was made in Circuitpython, and it is responsible for taking an animation/image and mapping it back to a specific LED in the larger matrix. The resulting effect looks like each fiber is lighting up randomly to produce the image at the front, and it is fun to attempt to trace it back.
For more information about this project and to download its design files, you can visit its write-up here on Instructables. This demo video also shows off what it looks like while in use.


Leave a comment