The World's Cheapest Infrared Camera Produces Images Pixel-by-Pixel for Just $11
from hackster.io
Digital imagining has existed for several decades now and has come down in price considerably since it was first introduced. Nearly all image sensors detect photons in the visible-light spectrum, but there are a few that are able to capture light in the infrared band (1,000nm to 14,000nm) too.
However, they tend to cost more than their regular counterparts owing to the need for increased processing and requiring different sensor types. Thermographic cameras use special lenses made from materials such as germanium, calcium fluoride, or crystalline silicon because regular glass blocks infrared radiation.
Additionally, their outputted images are monochrome and must be mapped to colors humans can see. This is normally done by overlaying areas of intense heat with a bright red/orange colors and cooler areas with blues/greens.
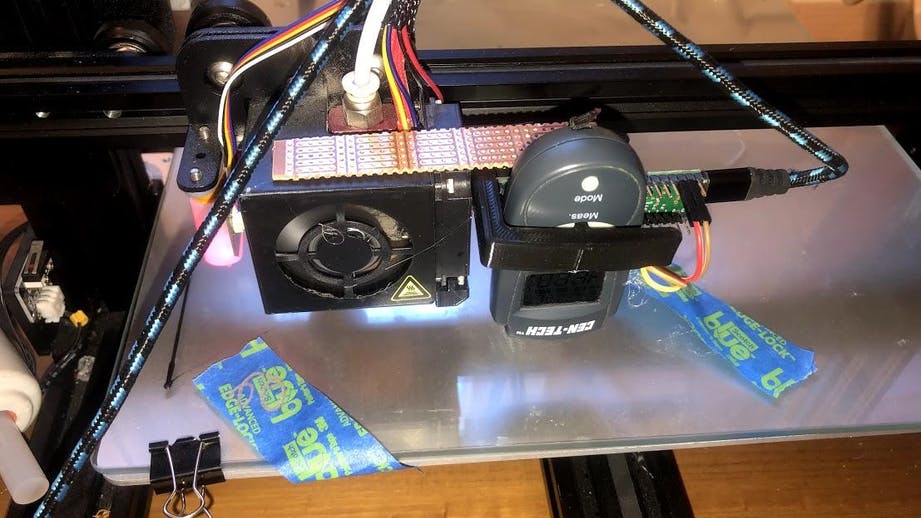
To avoid paying a large amount of money for this ability, Caleb Crome had the idea to build his own "camera" that uses a single infrared sensor that moves across an area to create an image. And even though the device takes a very long time to accomplish its task, it only costed around $11 to make.
To capture the necessary temperature data, ccrome began by partially taking apart an $11 infrared sensor that he picked up from a hardware store and discovered four convenient test points for clock, data, 3.3v, and ground.
He tried searching for the I2C data format but was unable to find anything useful, he created a small Arduino program that read the incoming data and spat it out into the serial monitor. He found that a total of 40 bits encode each data frame, and each one held 16 bits of temperature data when the first 8 were equal to 0x4c.
The next step was to get all of these temperature data frames and send them to a host machine for processing. As can be seen in the chart below, the sensor is very responsive to applied heat and provides quite granular measurements.
He then wrote a small Python script that sends GCODE commands to a 3D printer with the IR sensor attached and facing downwards. As the printer moves within a predetermined rectangular boundary, the temperature probe is constantly sending data back to the serial port where it is read and saved to a log file. This file essentially contains the x/y coordinates along with an associated temperature in each line.
Once the scanning process was complete, ccrome made another Python script that reads in the log file and places a corresponding pixel for each coordinate in the log. After this process completes, the heatmap is displayed to the user with the map in the middle and a small key to the right for the associated values.


Leave a comment